Archives

Golden brass sparrows

I’ve talked about these adorable sparrow connectors before but I just wanted to take a moment to show you how pretty the golden (raw) brass birds are:

golden raw brass sparrow connector charms

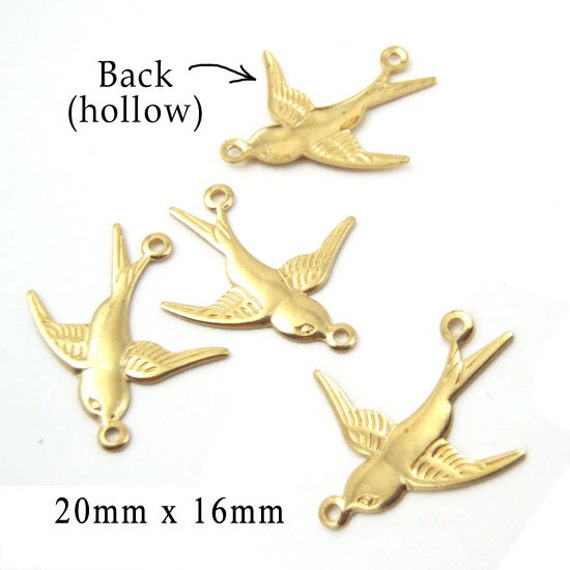
They really do make terrific earring links or dangles – or connectors for your necklace or bracelet. They’re versatile and work with so many styles.

But – small tip – you can also clip off one ring, file the ends gently, and use them “as is” for earrings. Pretty little golden birds, just a touch whimsical, and of course as earrings they go with practically everything. Plus, they’re lightweight and inexpensive. This really is a win!

Vintage white (and crystal) bridal jewels

White jewels are classic for wedding jewelry, of course – and I recently paired these two different styles – and made this super combo 🙂

white vintage glass teardrops and crystal square / diamond shape jewels...for bridal jewelry

The opaque white teardrops are vintage glass cabochon jewels made in post-war Japan (talk about “something old” – very cool!) The crystal jewels are new, and the faceting’s clean and modern.

Linked with silver jump rings, these would be fabulous for a bride. Modern, clean, and vintage too? This is a win 🙂

Ruby and sapphire glass jewels

We can’t all wear rubies and sapphres. And – I will say it right here – this doesn’t bother me at all. I’m kinda over feeling the need for Expensive Gemstones. Yes they’re beautiful (when they’re quality). But mostly I love color – and I think a lot of women feel the same way. Glass jewels are beautiful, they’re affordable, and they don’t damage the planet. Not as much as mining gems, anyway. So – glass jewels? A win-win.

Like these:


ruby red pear jewels and sapphire glass octagons

Used together as shown, wouldn’t those make a terrific pair of earrings? For about one squillionth the cost of “Fine gemstones”.

I don’t need fine gemstones. I want good looking jewelry, that I can make (or you can make), that I can afford, that’s fun to wear.

That’s a win 🙂

Vintage Blue Party Dress

Now this dress is hot! And I don’t just mean that it’s a summer dress – it’s a year round Wowza dress, is what it is.

vintage blue maxi dress

Look at that detailing! The waist detail, the draping, the spaghetti straps. The sexy slit. The wow factor.

This would feel fabulous – and look fabulous – and it would be easy to wear! Add some earrings, a jazzy necklace if you want, and some great shoes. Or go barefoot. Or wear it with flipflops for casual but glam.

You NEED this party dress. It’s available (as of this writing!) from Sailor Plus Vintage on Etsy. Paige, the curator, has some great finds there (I love the hawaiian print dress!) – and she gives clear, accurate pics and detail – you know how important that is when you’re buying online.

Go shopping. You’ll love it and you’ll thank me.

I mean – Wow!

Vintage summer mini dress

Take a look at this super, summertime mini dress:

vintage green mini dress

I love this dress. I love it because it’s JUST A DRESS. It looks great. It’s easy to wear. (I’d wear it with flipflops or strappy high heels, but hey that’s me.) It’s washable. It’s just a dress – the kind you want to toss on in the morning and just GO, and know it’s going to look good, and you’re going to look good, and it’s no big deal.

It doesn’t get much better than that, you know?

It’s available – right now, anyway – at Avid Noise – over at Etsy. Izzi, the shop owner, has some great stuff over there – which you already knew, because you’re looking at this dress.

And: it’s on sale. Go shopping. You’ll thank me.

PS Izzi’s tagline? “Vintage clothes inspired by the many great women in rock.” It’s not a coincidence that her icon at page top looks like Courtney Love… Hey, you know you have to check it out!

How to wire wrap a bead (a “Hangman’s Noose”)

The “hangman’s noose” wire wrap is probably the single most useful wire wrap you’ll ever learn. Once you master it (and it’s not hard) you can create professionally secure dangles and connectors with any beads and components.

The wrap is called the “hangman’s noose” (really!) I guess they used the same technique back in the old days, with rope. I’m going to just move from that now…!

I did a simple sketch to illustrate how to make this wrap:

how to do a hangmans noose wire wrap

Basically you slip your bead onto a headpin, make a loop around the tip of round-nose pliers, slip the loop onto a chain link, and then wrap the remainder of the headpin around the straight part of the wire. I think – I hope – the drawing makes that clear!

Holler (email me) if it doesn’t! And check YouTube too – there’s handy files there. This drawing is just an extra reference 🙂

A *new* “how to rearrange on Etsy”

Over at Etsy, they’ve revised the New Layout. Rearrange is a lot easier now for sellers 🙂 Here’s how it works:

* * * * * * * * * * * *

First, go to Your Shop / Shop Settings / Options

On the “options” page, under “Rearrange Your Shop”, you have the choice of:

“Enabled” – if this button is clicked, you will be able to “Custom Sort” your items – putting them anywhere you want;
or
“Disabled” means your items will show according to Recency – the items you’ve just listed will always show up first.

If you want to be able to rearrange any kind of way (other than the “most recent” on top), you need to click on “Enable” – so you can custom sort.

Then be sure to Save that (you’re still on the Options page).

Then to back to your Shop front page, and click on Edit Shop, and then Rearrange Items. After the first 24 items, you’ll see page numbers (and every listing will have its own number). You can click on any page number, find an item, and click on the item – then click on a page number to put that item on that page.

* * * * * * * * * * * *

So they really were listening to the peeps that said Guys, this ain’t working!

Props to Etsy!