|
|
This is something I take for granted – I use (and wear) a lot of ball chains, the simple chains that are used in the military to hold dog tags – and out in the jewelry world, to also hold dog tag pendants. Plus a lot of other necklaces and pendants.
They’re easy to open and close – once you know how. But if you aren’t used to them, they’re probably maddening! They don’t have a typical clasp. Instead, they have a connector as shown in the sketch below.

I think that shows it pretty well – basically, you find the little connector, hold it securely with your thumb and forefinger – and with the other hand, snap the little round balls out of the connector. Or slip the little ball back into the slot, to re-connect the chain. it’s easy – once you get used to it. And if it’s still difficult, drop me a note – we’ll figure it out!
Seriously, this morning I’m just reacting** (see below) to the “we need directions for everything” craze out there. I saw several posts over on Pinterest with “how to bake a potato in your microwave oven” type headlines. With pretty pictures, which admittedly I don’t have today. (If you want to see one, send me a note!)
But really. Would you like directions? Okay, here goes. Scrub your potato, just in case there’s dirt on there that’ll wash off. Then poke it with a knife. This part’s important – there’s enough liquid in the potato that it could kind of explode if the heat builds up enough while it’s cooking. Very messy.
Anyway, you washed your potato and poked a couple holes in it. Then put it in your microwave, set the timer for 6 or 8 minutes, depending on how strong your microwave, how big the potato, and the phase of the moon (yes, I’m kidding about the moon part). Hit START.
When the timer goes off, grab a potholder because this potato’s going to be hot. See if it’s kind of squishy when you push at it. If it’s still hard(ish), give it a couple more minutes. If it’s soft, it’s done.
Honestly, if there’s more we need to know, I will revisit this post. If not, treat “how to microwave a potato” in the same vein as “how to boil water”.
** Okay, maybe “overreacting”…
Just a quick note here – I did a comparison to see what the Curves function in photoshop would do for a “quick fix” on a photo. Brian, thanks for letting me play with this!
Going to try a few more examples later, just playing with ideas 🙂
Talk about a useful Tip of the Day ! I just got a lovely big supply of garden fresh green beans from a dear friend (somehow my garden didn’t happen this year). I was getting ready to blanch most of them, because much as we love green beans we can’t eat them all up in a few days.
Then I had an attack of brains and thought, I ought to doublecheck the best method – you know that’s one of the reasons we love the web. And I found this most wonderful article on how to freeze fresh green beans, without having to blanch them first.

I am trying this TODAY.
A huge thank you to Jami, of An Oregon Cottage, who kindly gave permission to share her idea with a link to her blog. She has some wonderful advice – and project articles there – you are going to have so much fun!
And I’ll share pronto, how the beans turned out 🙂
PS! Edited (days later) to add this: the beans turned out to be very tasty. I did need to spend a little longer cooking them (they were chewier than usual) – but they really were good. And easy to prepare: I tried two different ways. First time, I steamed them for several minutes. Second time, I microwaved them with just a smidge of butter, for about 2-3 minutes. Both methods worked. Save yourself time – freeze those wonderful fresh green beans!
The “hangman’s noose” wire wrap is probably the single most useful wire wrap you’ll ever learn. Once you master it (and it’s not hard) you can create professionally secure dangles and connectors with any beads and components.
The wrap is called the “hangman’s noose” (really!) I guess they used the same technique back in the old days, with rope. I’m going to just move from that now…!
I did a simple sketch to illustrate how to make this wrap:

Basically you slip your bead onto a headpin, make a loop around the tip of round-nose pliers, slip the loop onto a chain link, and then wrap the remainder of the headpin around the straight part of the wire. I think – I hope – the drawing makes that clear!
Holler (email me) if it doesn’t! And check YouTube too – there’s handy files there. This drawing is just an extra reference 🙂
Over at Etsy, they’ve revised the New Layout. Rearrange is a lot easier now for sellers 🙂 Here’s how it works:
* * * * * * * * * * * *
First, go to Your Shop / Shop Settings / Options
On the “options” page, under “Rearrange Your Shop”, you have the choice of:
“Enabled” – if this button is clicked, you will be able to “Custom Sort” your items – putting them anywhere you want;
or
“Disabled” means your items will show according to Recency – the items you’ve just listed will always show up first.
If you want to be able to rearrange any kind of way (other than the “most recent” on top), you need to click on “Enable” – so you can custom sort.
Then be sure to Save that (you’re still on the Options page).
Then to back to your Shop front page, and click on Edit Shop, and then Rearrange Items. After the first 24 items, you’ll see page numbers (and every listing will have its own number). You can click on any page number, find an item, and click on the item – then click on a page number to put that item on that page.
* * * * * * * * * * * *
So they really were listening to the peeps that said Guys, this ain’t working!
Props to Etsy!
My main jewelry supplies store is Weekendjewelry1 on Etsy. Like many Etsy sellers, I’ve been struggling a bit to figure out how to rearrange my shop items in the new mobile-friendly layout.
And now that I have it mostly figured out, I thought it might be a good idea to share (and save!) the method:
1. Click on “Edit Shop”
2. Go to the bottom of your first 24 items and click on “More Items”. Repeat as needed, till they’re all available in one long page.
3. Now go back to the top and click on “REARRANGE”.
4. A number will appear in the upper right corner of every listing. Find the listing you want to move to your No. 1 slot – and type 1.
5. Hit Enter. Presto – your fisrt item is now in your Number 1 slot.
6. Repeat with your Number 2 choice. And Number 3, and etc.
7. View Shop when you’ve moved all the items you want to.
Your items should now be in their new positions. (Okay, it works for me – send me a note if you need help!)
This may sound like something you’ll hardly ever do – but if you end up buying stones and settings separately (rather than having the stones pre-set before you buy them) it’s handy to learn these little tips. Your crimpiing pliers are really helpful here.
In many settings, the tiny stone is 20ss (or “stone size”) – and 20ss is about 4.5mm. I did a little sketch to give a few helpful tips when setting them.
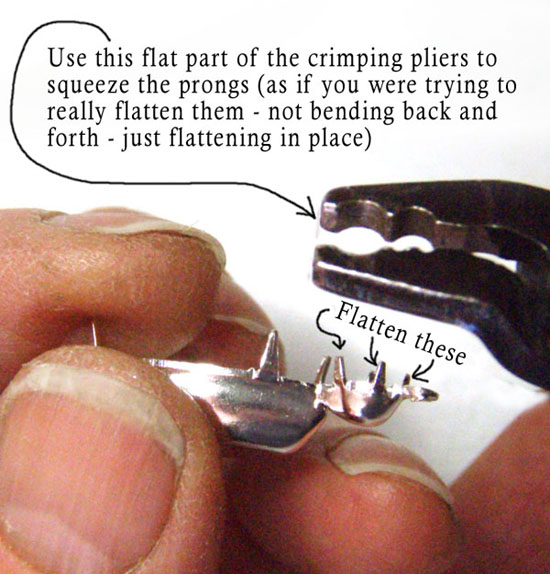
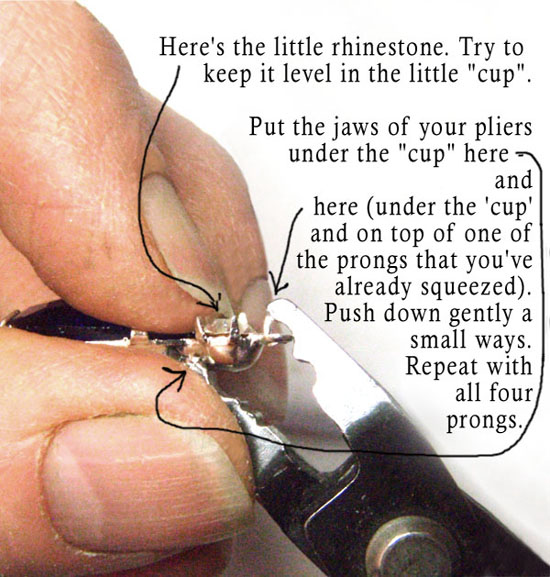
One of the most important things to remember, after you squeeze (flatten) the little prongs, is to close them *slightly* over the stone. Don’t try to flatten them all the way down to the glass – you’ll chip something. With all the prongs gently leaning toward the “closed” position, your stone will be protected and secure.
And if this isn’t your cup of tea, you can always – you know – buy stones already in settings. Like in my Etsy shop 🙂
This is just a handy little tip. When you’re setting glass stones in brass (or silver, or you-name-it) settings, very often they don’t quite fit. Especially vintage stones. (No, actually, it’s a crapshoot with any stones. Seems like there are always little discrepancies between what they ought to be, and what they Are.)
So if your jewel, your stone, is just a little too big, try this:
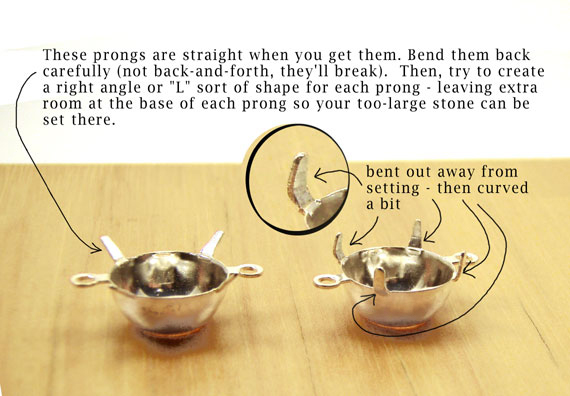
It won’t work if your stone is way too big. But a millimeter or so (and that’s a LOT, with calibrated stones) – you can make it work.
I’ll do more pics soon – i.e., what if your stone is too *small*?
It can be done 🙂
I recently found a simple, easy to follow post about doing your own product photography. It’s cheap, it’s easy to understand – not only what she does but WHY she does it – and the tips really do help! I found it over at Apartment Therapy which you know I think is pretty wonderful anyway.
And talk about wonderful – the article will help you make your product photos can look like this:

By starting with this:

Obviously there’s a lot more detail when you read the article. I think you’ll find it as useful as I did 🙂
|
Jewelry and Accessories
Vintage, Recycled, Upcycled!
|