Archives

How to make earrings – basics!

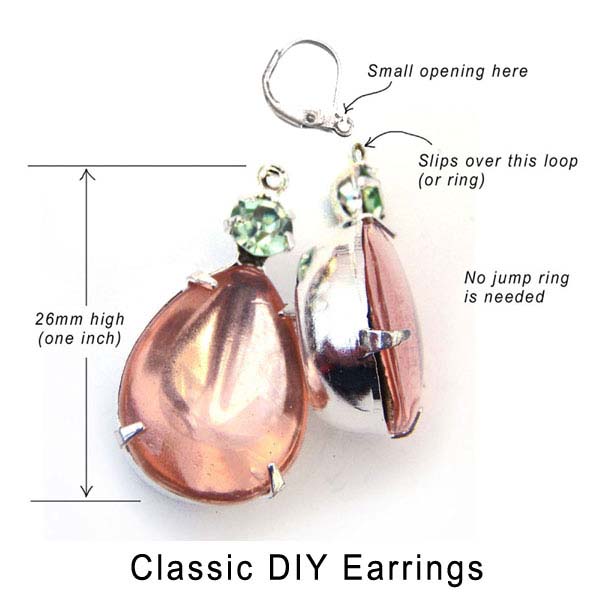
I thought, maybe once in a while we should show the absolute basics on how to make earrings. Like so many things, it’s easy once you know. But you might never have looked closely at the little connectors, etc, so it’s still a mystery. Well – now it won’t be. You can create some fabulous jewelry with this simple technique. (Or go as fancy and complicated as you want, that’s the beauty of it!)

DIY earrings how to tutorial picture

Add whatever extras and variations you like – you’ll love the customization – this is just the start 🙂

DIY earrings – save money – make gifts – or sell your jewelry!

How to open a ball chain

This is something I take for granted – I use (and wear) a lot of ball chains, the simple chains that are used in the military to hold dog tags – and out in the jewelry world, to also hold dog tag pendants. Plus a lot of other necklaces and pendants.

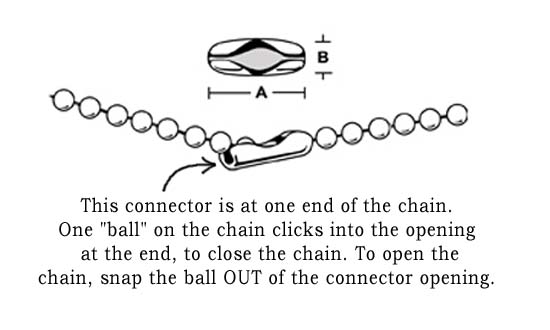
They’re easy to open and close – once you know how. But if you aren’t used to them, they’re probably maddening! They don’t have a typical clasp. Instead, they have a connector as shown in the sketch below.

sketch showing how to open a ball chain

I think that shows it pretty well – basically, you find the little connector, hold it securely with your thumb and forefinger – and with the other hand, snap the little round balls out of the connector. Or slip the little ball back into the slot, to re-connect the chain. it’s easy – once you get used to it. And if it’s still difficult, drop me a note – we’ll figure it out!

How to microwave a baked potato

Seriously, this morning I’m just reacting** (see below) to the “we need directions for everything” craze out there. I saw several posts over on Pinterest with “how to bake a potato in your microwave oven” type headlines. With pretty pictures, which admittedly I don’t have today. (If you want to see one, send me a note!)

But really. Would you like directions? Okay, here goes. Scrub your potato, just in case there’s dirt on there that’ll wash off. Then poke it with a knife. This part’s important – there’s enough liquid in the potato that it could kind of explode if the heat builds up enough while it’s cooking. Very messy.

Anyway, you washed your potato and poked a couple holes in it. Then put it in your microwave, set the timer for 6 or 8 minutes, depending on how strong your microwave, how big the potato, and the phase of the moon (yes, I’m kidding about the moon part). Hit START.

When the timer goes off, grab a potholder because this potato’s going to be hot. See if it’s kind of squishy when you push at it. If it’s still hard(ish), give it a couple more minutes. If it’s soft, it’s done.

Honestly, if there’s more we need to know, I will revisit this post. If not, treat “how to microwave a potato” in the same vein as “how to boil water”.

** Okay, maybe “overreacting”…

How To clasp your bracelet with a lobster clasp – video

We love lobster clasps for the way they make our bracelet secure – even though they drive us nuts, trying to attach them. But not any more! I found this super fun “how to” video from Cleverly on Youtube – and it’s such a great idea!


See what I mean? Easy peasy – now you can wear all your fun bracelets. And if you make bracelets to sell, show your customers this simple trick – they’ll thank you – and love your bracelets!

How to add tiny stones to a two-jewel setting

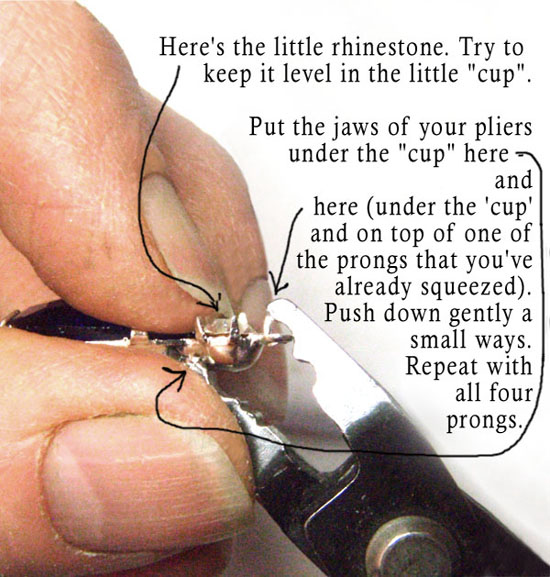
This may sound like something you’ll hardly ever do – but if you end up buying stones and settings separately (rather than having the stones pre-set before you buy them) it’s handy to learn these little tips. Your crimpiing pliers are really helpful here.

In many settings, the tiny stone is 20ss (or “stone size”) – and 20ss is about 4.5mm. I did a little sketch to give a few helpful tips when setting them.

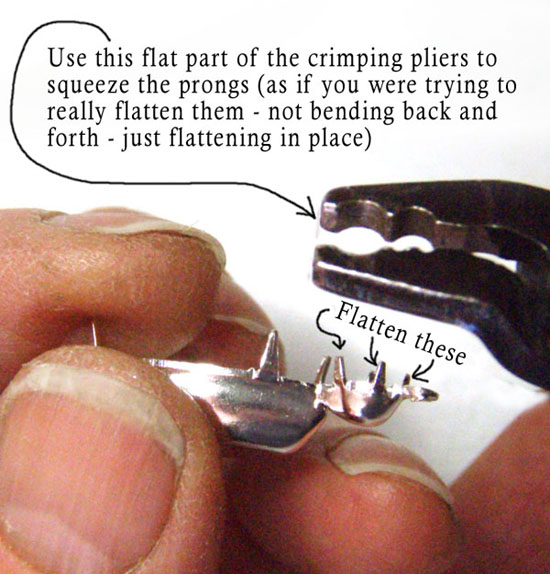
tips on setting tiny glass stones in settings ... part 1
tips for setting small glass stones in settings...part 2

One of the most important things to remember, after you squeeze (flatten) the little prongs, is to close them *slightly* over the stone. Don’t try to flatten them all the way down to the glass – you’ll chip something. With all the prongs gently leaning toward the “closed” position, your stone will be protected and secure.

And if this isn’t your cup of tea, you can always – you know – buy stones already in settings. Like in my Etsy shop 🙂

How – and why – to use a jump ring

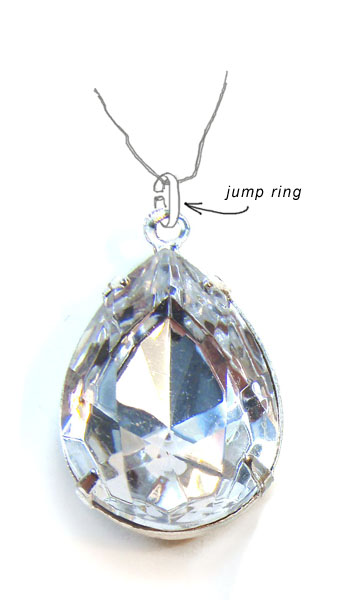
Several time customers have asked me what’s the easy way to attach a glass jewel to a chain, to turn a “teardrop jewel” into a pendant. Jump rings are the quick, classic way. So I did a couple quick sketches, to illustrate more clearly than a few paragraphs could, how and why we use a jump ring.

a jump ring being used to attach a pendant to a chain

See what I mean? No long explanation needed. You open the jump ring (see next pic), slip it on the chain, and slip the little ring at the top of a jewel setting onto the ring. Then close the ring. Voila: your jewel is a pendant. You’ve got a necklace.

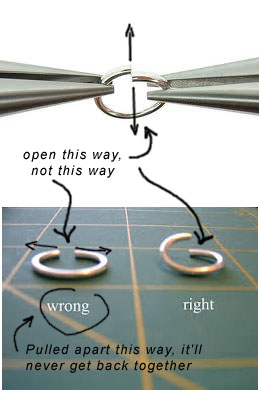
The second sketch shows the correct way to open the jump ring. It matters because if you open the ring sideways, it’s easy to close back up securely. If you stretch it wide – it’ll never get closed up properly again. The sketch helps explain 🙂

how to open a jump ring

See? Easy peasy. Open it sideways. Close it back up. There are tons of tutorials and videos over on YouTube if you want to go peek – but this is the basics they pretty much all cover. Jewelry Making 101 – and this simple bit of assembly knowledge will go a long way for you 🙂

PS The second pic is one I found – and I forgot to write down the link. If you know the original poster, would you let me know so I can give credit? Thank you!

Maxi Dress refashioned into a Maxi Skirt

Are you always looking for ways to look chic, fashionable and fabulous – and not spend a lot of money? Yeah, welcome to the club. I just found this little DIY tutorial and it’s so simple – and smart – I just wanted to share. And there’s an added bonus, too 🙂

Savvy Lou DIY - maxidress to maxiskirt

Click on the pic and it takes you to her instructions and her blog. And, to give you an idea of the bonus I was talking about, look at this great outfit:

Savvy Lou Fabulous and Thrifty Outfit

The pic takes you to Savvy Lou’s blog – and her blog is the bonus. Why, you ask? Search for the entry that says “Classics With Taupe”, or just go halfway down the page, and you’ll find this breakdown of what she spent to create that super outfit:

Croft & Barrow shirt ($2, Salvation Army)
Investments skirt ($2, Goodwill)
Belt ($2, Salvation Army)
Wooden Bracelet (gift, Good Wood)
Merona Booties ($10.48, Target)
NewYork Color nail color, Flat Iron Green ($1, Dollar Tree)

You see what I mean? This girl is cute and dresses well and she’s SMART. She is a fashionista resource!

Tutorial – How to remove bad foil from your Vintage Glass Jewels

If you buy vintage glass jewels or rhinestones, you know what I’m talking about – sometimes the foil is wonderful and adds gorgeous sparkle to your jewels. And sometimes it’s really bad, and they’re just not useable “as is”.

It’s easy to remove the foil and this tutorial will tell you the secret 🙂 (Okay, it’s not really secret. But it is handy to know!)

Turn your jewels from this:
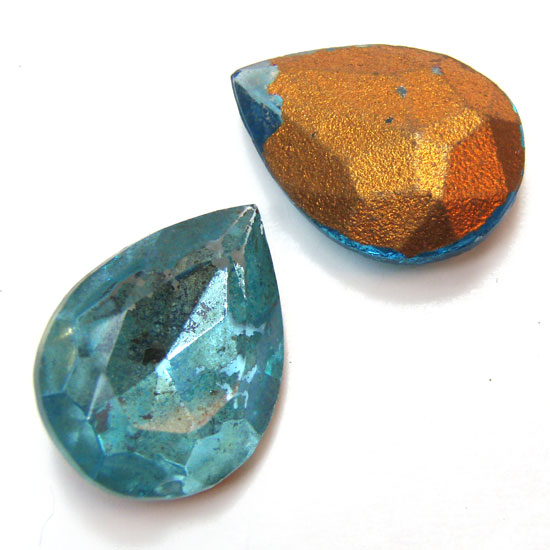
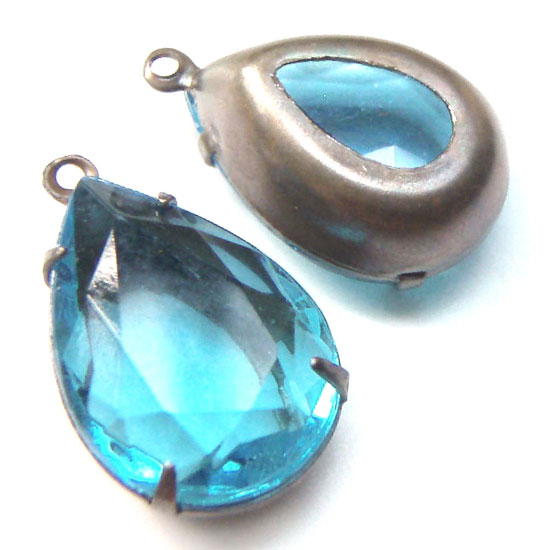
Aqua Vintage Glass Pear Rhinestone Jewels - with bad foil

To this:

Aqua 18mm x 13mm Vintage Glass Pear Jewels

And how do you do it? You soak them in vinegar and salt. That’s it 🙂

Take a small dish or bowl (or plastic tub that used to add margarine or something). If your container has a lid that’s an extra plus – that’s just to help contain the vinegar odor, it doesn’t make any difference to the cleaning process.

(And actually I like the smell of vinegar – to me, it says “clean”, because I use vinegar for an effective, non-toxic cleaning supply.)

It doesn’t have to be fancy expensive vinegar – plain old white vinegar is fine. Put a half cup or so in your plastic container. Add some salt – say a teaspoon (I never actually measure). Stir with a spoon or your finger to dissolve the salt, at least mostly. If you use a spoon, rinse it off afterwards. The acid in the vinegar – that helps so much to remove the foil from your jewel – can also eat away at the metal of your spoon, just a little bit. (For the same reason, don’t put the jewels in this solution, when they’re in metal settings. I’ve done it by accident – and the vinegar will eat away at the setting, enough to etch the surface and make it rough and unuseable.)

Leave the jewels in the vinegar solution for a couple hours, or overnight. It depends on the jewel and the maufacturer – sometimes it only needs an hour and the foil comes off like peeling a grape, a simple rub and you’re done. Sometimes it’s more stubborn, and you need to soak them overnight, and then rub or scour them a bit with your fingers. But I’ve (almost) never found jewels where this didn’t work.

And now your jewels are shining, and very clean (oh! rinse the vinegar off when they’re done – again, just because of the smell). And you can make beautiful jewelry 🙂

P.S. Save the container with the vinegar – you can use it again and again.

P.P.S. An interesting side note. If you do this with a lot of jewels (I do, because I buy a lot of jewels, and probably half? of them have bad foil) – after a while, your vinegar will turn deep turquoise in color. Transparent, but still! Whether the foil is “silver” or “gold” in color, the inner layer of foil (there are usually 2 or 3) has copper in it. And in some scientific spectrum or other, copper = turquoise. Very cool 🙂