Archives

How to wire wrap a bead (a “Hangman’s Noose”)

The “hangman’s noose” wire wrap is probably the single most useful wire wrap you’ll ever learn. Once you master it (and it’s not hard) you can create professionally secure dangles and connectors with any beads and components.

The wrap is called the “hangman’s noose” (really!) I guess they used the same technique back in the old days, with rope. I’m going to just move from that now…!

I did a simple sketch to illustrate how to make this wrap:
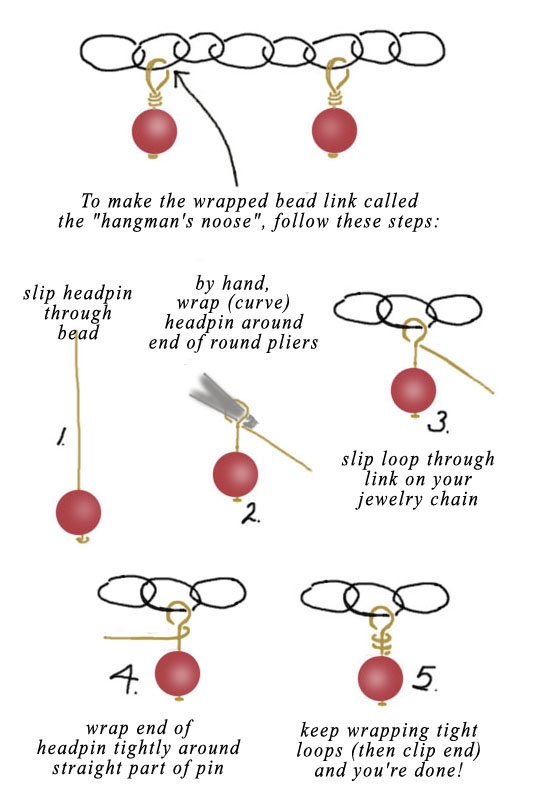
how to do a hangmans noose wire wrap

Basically you slip your bead onto a headpin, make a loop around the tip of round-nose pliers, slip the loop onto a chain link, and then wrap the remainder of the headpin around the straight part of the wire. I think – I hope – the drawing makes that clear!

Holler (email me) if it doesn’t! And check YouTube too – there’s handy files there. This drawing is just an extra reference 🙂
A *new* “how to rearrange on Etsy”

Over at Etsy, they’ve revised the New Layout. Rearrange is a lot easier now for sellers 🙂 Here’s how it works:

* * * * * * * * * * * *

First, go to Your Shop / Shop Settings / Options

On the “options” page, under “Rearrange Your Shop”, you have the choice of:

“Enabled” – if this button is clicked, you will be able to “Custom Sort” your items – putting them anywhere you want;
or
“Disabled” means your items will show according to Recency – the items you’ve just listed will always show up first.

If you want to be able to rearrange any kind of way (other than the “most recent” on top), you need to click on “Enable” – so you can custom sort.

Then be sure to Save that (you’re still on the Options page).

Then to back to your Shop front page, and click on Edit Shop, and then Rearrange Items. After the first 24 items, you’ll see page numbers (and every listing will have its own number). You can click on any page number, find an item, and click on the item – then click on a page number to put that item on that page.

* * * * * * * * * * * *

So they really were listening to the peeps that said Guys, this ain’t working!

Props to Etsy!

How to REARRANGE on Etsy

My main jewelry supplies store is Weekendjewelry1 on Etsy. Like many Etsy sellers, I’ve been struggling a bit to figure out how to rearrange my shop items in the new mobile-friendly layout.

And now that I have it mostly figured out, I thought it might be a good idea to share (and save!) the method:

1. Click on “Edit Shop”
2. Go to the bottom of your first 24 items and click on “More Items”. Repeat as needed, till they’re all available in one long page.
3. Now go back to the top and click on “REARRANGE”.
4. A number will appear in the upper right corner of every listing. Find the listing you want to move to your No. 1 slot – and type 1.
5. Hit Enter. Presto – your fisrt item is now in your Number 1 slot.
6. Repeat with your Number 2 choice. And Number 3, and etc.
7. View Shop when you’ve moved all the items you want to.

Your items should now be in their new positions. (Okay, it works for me – send me a note if you need help!)

How To clasp your bracelet with a lobster clasp – video

We love lobster clasps for the way they make our bracelet secure – even though they drive us nuts, trying to attach them. But not any more! I found this super fun “how to” video from Cleverly on Youtube – and it’s such a great idea!


See what I mean? Easy peasy – now you can wear all your fun bracelets. And if you make bracelets to sell, show your customers this simple trick – they’ll thank you – and love your bracelets!

How to add tiny stones to a two-jewel setting

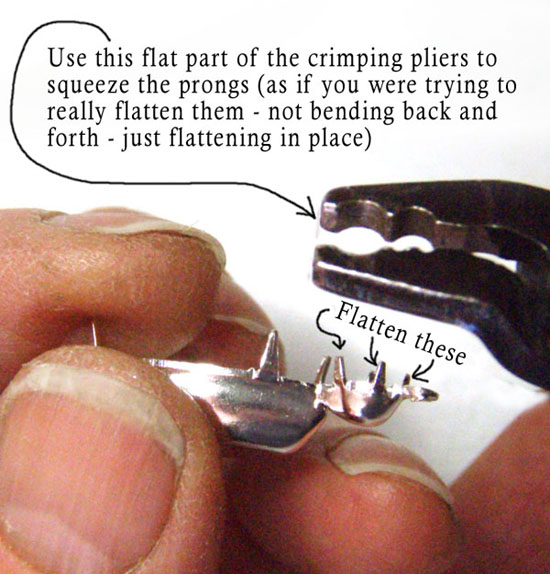
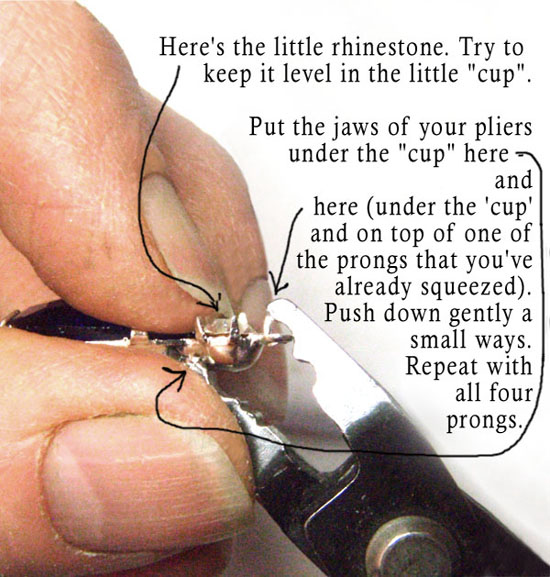
This may sound like something you’ll hardly ever do – but if you end up buying stones and settings separately (rather than having the stones pre-set before you buy them) it’s handy to learn these little tips. Your crimpiing pliers are really helpful here.

In many settings, the tiny stone is 20ss (or “stone size”) – and 20ss is about 4.5mm. I did a little sketch to give a few helpful tips when setting them.

tips on setting tiny glass stones in settings ... part 1
tips for setting small glass stones in settings...part 2

One of the most important things to remember, after you squeeze (flatten) the little prongs, is to close them *slightly* over the stone. Don’t try to flatten them all the way down to the glass – you’ll chip something. With all the prongs gently leaning toward the “closed” position, your stone will be protected and secure.

And if this isn’t your cup of tea, you can always – you know – buy stones already in settings. Like in my Etsy shop 🙂